
本記事ではそんな疑問にお答えします。
スクロールしたら隠れるBottomNavigationBarの実装方法について解説します。
本記事を読めば以下のGIFの動作をするBottomNavigationBarを実装できます。
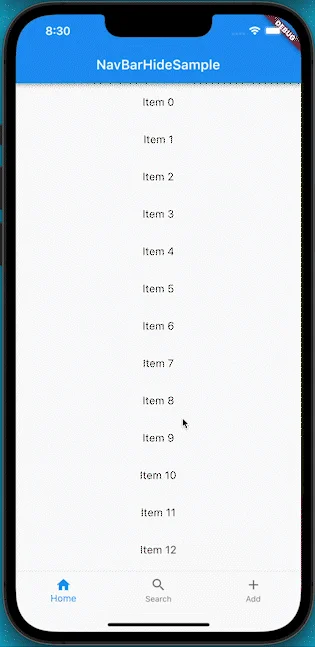
特別なパッケージやStatefulWidget以外の状態管理手法無しで実装が可能です。
実装コードはこちら
import 'package:flutter/material.dart';
import 'package:flutter/rendering.dart';

void main() {
  runApp(const MyApp());
}

class MyApp extends StatelessWidget {
  const MyApp({super.key});

  @override
  Widget build(BuildContext context) {
    return const MaterialApp(
      home: MyWidget(),
    );
  }
}

class MyWidget extends StatefulWidget {
  const MyWidget({super.key});

  @override
  State createState() => _MyWidgetState();
}

class _MyWidgetState extends State
    with SingleTickerProviderStateMixin {
  late AnimationController _animationController;
  late Animation _height;

  late ScrollController _scrollController;

  bool isHidden = false;

  int _selectedIndex = 0;

  @override
  void initState() {
    super.initState();

    _animationController = AnimationController(
      vsync: this,
      duration: const Duration(milliseconds: 500),
    );

    _height = Tween(begin: 0, end: 100).animate(_animationController);

    _scrollController = ScrollController()
      ..addListener(() {
        if (_scrollController.position.userScrollDirection ==
            ScrollDirection.reverse) {
          if (!isHidden) {
            _animationController.forward();
            isHidden = true;
          }
        } else {
          if (isHidden) {
            _animationController.reverse();
            isHidden = false;
          }
        }
      });
  }

  @override
  void dispose() {
    _animationController.dispose();
    _scrollController.dispose();
    super.dispose();
  }

  @override
  Widget build(BuildContext context) {
    return Scaffold(
      appBar: AppBar(
        title: const Text('NavBarHideSample'),
      ),
      body: Stack(
        children: [
          IndexedStack(
            index: _selectedIndex,
            children: [
              ListView.builder(
                controller: _scrollController,
                itemCount: 100,
                itemBuilder: (context, index) => ListTile(
                  title: Center(child: Text('Item $index')),
                ),
              ),
              const Center(child: Text('Page 2')),
              const Center(child: Text('Page 3')),
            ],
          ),
          Positioned(
            bottom: 0,
            left: 0,
            right: 0,
            child: AnimatedBuilder(
              animation: _height,
              builder: (BuildContext context, Widget? child) {
                return Transform.translate(
                  offset: Offset(0, _height.value),
                  child: BottomNavigationBar(
                    currentIndex: _selectedIndex,
                    onTap: (index) {
                      setState(() {
                        _selectedIndex = index;
                      });
                    },
                    items: const [
                      BottomNavigationBarItem(
                        icon: Icon(Icons.home),
                        label: 'Home',
                      ),
                      BottomNavigationBarItem(
                        icon: Icon(Icons.search),
                        label: 'Search',
                      ),
                      BottomNavigationBarItem(
                        icon: Icon(Icons.add),
                        label: 'Add',
                      ),
                    ],
                  ),
                );
              },
            ),
          ),
        ],
      ),
    );
  }
}
以下で実装コードの解説を行います。
ぜひ読んで実装に挑戦してみて下さい!
実装解説
アニメーションの実装について
mixin
今回の実装ではBottomNavigationBarを下側へ移動するアニメーションを実装します。
アニメーションの実装において、 フレーム(アニメーション等の画面描画で1秒ごとに切り替わる画面)の 切り替わりタイミングの検知が必要となります。
これに有用なのがTickerで、Tickerを生成するのがTickerProviderの実装クラスです。
AnimationControllerはコンストラクタの引数にてこのTickerProviderの実装クラスを要求します。
TickerProviderを利用する方法として、
今回はアニメーションを実装するWidgetをStatefulWidgetとし、
TickerProviderの実装クラスのSingleTickerProviderStateMixin を
mixin して利用する方法を使います。
実装のコードは以下の部分となります。
class _MyWidgetState extends State
    with SingleTickerProviderStateMixin {
  late AnimationController _animationController;

// ・・・

  @override
  void initState() {
    super.initState();

    _animationController = AnimationController(
      //1
      vsync: this,
      //2
      duration: const Duration(milliseconds: 500),
    );

// ・・・
// 1
TickerProviderの設定部分です。
SingleTickerProviderStateMixinをwith(mixin)しているので、thisで設定することが可能です。
//2 アニメーションの全体の時間を設定する部分です。
数値パラメータの変更設定
以下のコードで数値パラメータの変更設定を行います。
この値の宣言時に、先で定義したAnimationControllerを渡します。
// ・・・
  @override
  void initState() {
    super.initState();

    _animationController = AnimationController(
      vsync: this,
      duration: const Duration(milliseconds: 500),
    );
    //3
    _height = Tween(begin: 0, end: 100).animate(_animationController);
// ・・・
//3
0から100までの値をどのように変化させるかを定義している部分です。
今回は線形(一定速度)で変化させるように設定するためTweenを用いています。
BottomNavigationBar をズラすアニメーションの実装
BottomNavigationBar をAnimationBuilderでのラップします。
// ・・・
          Positioned(
            bottom: 0,
            left: 0,
            right: 0,
            //4
            child: AnimatedBuilder(
              animation: _height,
              builder: (BuildContext context, Widget? child) {
                //5
                return Transform.translate(
                  offset: Offset(0, _height.value),
                  child: BottomNavigationBar(
                    currentIndex: _selectedIndex,
                    onTap: (index) {
                      setState(() {
                        _selectedIndex = index;
                      });
                    },
                    items: const [
                      BottomNavigationBarItem(
                        icon: Icon(Icons.home),
                        label: 'Home',
                      ),
                      BottomNavigationBarItem(
                        icon: Icon(Icons.search),
                        label: 'Search',
                      ),
                      BottomNavigationBarItem(
                        icon: Icon(Icons.add),
                        label: 'Add',
                      ),
                    ],
                  ),
                );
              },
            ),
          ),
// ・・・
// 4
アニメーションを構成するAnimatiedBuilderの定義部分です。
上で宣言した_heightをanimationに設定します。
//5
Transform Widget のtransrateコンストラクタでBottomNavigationBarを囲い、
Offset(0, _height.value)だけ平行移動させています。
この_height.valueが変化することで、下にずれるようなアニメーションが実装できます
Offsetの第1引数は横方向のズレを、第2引数は縦方向のズレを表現しています。
一番上が0で、値が増えるにつれ、下にずれていきます。
そのため、Offset(0, 100)は、下に100ズレることを表します。
スクロールの検知
ScrollController
スクロールの検知はScrollControllerによって行います。
class _MyWidgetState extends State
    with SingleTickerProviderStateMixin {
// ・・・

  late ScrollController _scrollController;

  bool isHidden = true;

 // ・・・

  @override
  void initState() {
    super.initState();

// ・・・
    //6
    _scrollController = ScrollController()
      ..addListener(() {
        if (_scrollController.position.userScrollDirection ==
            ScrollDirection.reverse) {
          if (!isHidden) {
            _animationController.forward();
            isHidden = true;
          }
        } else {
          if (isHidden) {
            _animationController.reverse();
            isHidden = false;
          }
        }
      });
  }
// ・・・
//6
ScrollController でスクロール時の挙動を監視し、その際の実行内容を定義している部分です。
今回は、下から上に画面が移動する方向のスクロールがされたかどうかを確認し、
その際にはアニメーションを実行する、という設定としています。
List への設定
スクロールを検知したいListに対して先程設定したScrollControllerを設定します。
// ・・・
  @override
  Widget build(BuildContext context) {
    return Scaffold(
      appBar: AppBar(
        title: const Text('NavBarHideSample'),
      ),
      body: Stack(
        children: [
          IndexedStack(
            index: _selectedIndex,
            children: [
              ListView.builder(
                //7
                controller: _scrollController,
                itemCount: 100,
                itemBuilder: (context, index) => ListTile(
                  title: Center(child: Text('Item $index')),
                ),
              ),
              const Center(child: Text('Page 2')),
              const Center(child: Text('Page 3')),
            ],
          ),
// ・・・
//7
Controllerの設定部分となります。上で定義した_scrollControllerを設定しています。
完成したコード
解説は以上となります!
完成したコードを再度掲載します。 以下のボタンをクリックすればコード全体を見ることができます。
実装コードはこちら
import 'package:flutter/material.dart';
import 'package:flutter/rendering.dart';

void main() {
  runApp(const MyApp());
}

class MyApp extends StatelessWidget {
  const MyApp({super.key});

  @override
  Widget build(BuildContext context) {
    return const MaterialApp(
      home: MyWidget(),
    );
  }
}

class MyWidget extends StatefulWidget {
  const MyWidget({super.key});

  @override
  State createState() => _MyWidgetState();
}

class _MyWidgetState extends State
    with SingleTickerProviderStateMixin {
  late AnimationController _animationController;
  late Animation _height;

  late ScrollController _scrollController;

  bool isHidden = false;

  int _selectedIndex = 0;

  @override
  void initState() {
    super.initState();

    _animationController = AnimationController(
      vsync: this,
      duration: const Duration(milliseconds: 500),
    );

    _height = Tween(begin: 0, end: 100).animate(_animationController);

    _scrollController = ScrollController()
      ..addListener(() {
        if (_scrollController.position.userScrollDirection ==
            ScrollDirection.reverse) {
          if (!isHidden) {
            _animationController.forward();
            isHidden = true;
          }
        } else {
          if (isHidden) {
            _animationController.reverse();
            isHidden = false;
          }
        }
      });
  }

  @override
  void dispose() {
    _animationController.dispose();
    _scrollController.dispose();
    super.dispose();
  }

  @override
  Widget build(BuildContext context) {
    return Scaffold(
      appBar: AppBar(
        title: const Text('NavBarHideSample'),
      ),
      body: Stack(
        children: [
          IndexedStack(
            index: _selectedIndex,
            children: [
              ListView.builder(
                controller: _scrollController,
                itemCount: 100,
                itemBuilder: (context, index) => ListTile(
                  title: Center(child: Text('Item $index')),
                ),
              ),
              const Center(child: Text('Page 2')),
              const Center(child: Text('Page 3')),
            ],
          ),
          Positioned(
            bottom: 0,
            left: 0,
            right: 0,
            child: AnimatedBuilder(
              animation: _height,
              builder: (BuildContext context, Widget? child) {
                return Transform.translate(
                  offset: Offset(0, _height.value),
                  child: BottomNavigationBar(
                    currentIndex: _selectedIndex,
                    onTap: (index) {
                      setState(() {
                        _selectedIndex = index;
                      });
                    },
                    items: const [
                      BottomNavigationBarItem(
                        icon: Icon(Icons.home),
                        label: 'Home',
                      ),
                      BottomNavigationBarItem(
                        icon: Icon(Icons.search),
                        label: 'Search',
                      ),
                      BottomNavigationBarItem(
                        icon: Icon(Icons.add),
                        label: 'Add',
                      ),
                    ],
                  ),
                );
              },
            ),
          ),
        ],
      ),
    );
  }
}
まとめ
本記事では、スクロールしたら隠れるBottomNavigationBarの実装方法について解説しました。
いかがだったでしょうか?
少しテクニカルですが、実装自体は130行ちょっとで実装可能です。
是非本記事を参考にして、実装に挑戦してみて下さい!
本記事があなたのアプリ開発の一助となれば幸いです。
Flutterを一緒に学んでみませんか? Flutter エンジニアに特化した学習コミュニティ、Flutter大学への入会は、 以下の画像リンクから。
参考
編集後記(2022/7/23)
本記事ではスクロールした際にBottomNavigationBar を隠す方法についての解説記事でした。
参考の記事にかかれていた方法をベースに、 他のパッケージに依存しない形で簡略化したのが本記事となります。
参考の記事のほうが汎用性がある形のコードを紹介していますので、 興味のある方は、ぜひ参考の記事も読んでみて下さい。
今回は、想定通りの挙動を実現するのに結構苦労しました。
もっと構築力や、動かない際の原因把握能力を強めていきたい気持ちですね。
今後も精進して行こうと思います。
週刊Flutter大学では、Flutterに関する技術記事、Flutter大学についての紹介記事を投稿していきます。 記事の更新情報はFlutter大学Twitterにて告知します。
