

本記事ではこのような疑問にお答えします。
Material You で推奨となっているBottom Navigation Barの実装方法について 解説します。
具体的には以下のようなBottom Navigation Barの実装となります。
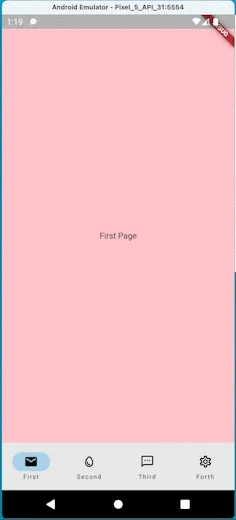
ぜひ読んでみてください!
Material You の Bottom Navigation Bar の概要

Material Youとは
Material You , ( Material 3 ) はAndroid 12から導入されている Google の新たなデザインフレームワークです。
今後のAndroid のデザインは、このフレームワークに沿って行われる予定です。
マルチプラットフォームでのFlutterでもこのフレームワークに沿って、 Android アプリを構築することで、 Android ユーザーにとって違和感のないデザインが実現できます。
Material You の Bottom Navigation Bar
Material You のBottom Navigation Barの見た目は以下のようになります。
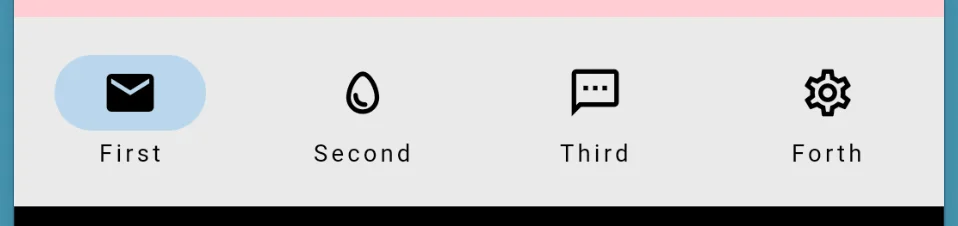
アイコンの周りをインディケーターで囲むことで、 どのタブが選択されているかよりわかりやすい表現となっています。
また名称も、” BottomNavigationBar “から ” Navigation Bar ” に変更となっています。
次の章では、このNavigation Barの実装方法について解説していきます。
Navigation Bar の実装方法

Navigation Barの実装方法について解説していきます。
本例では簡略化のため、StatefulWidgetでの実装方法を解説していきます。
今回のサンプルコードは、以下のDartPadに記載しています。
ぜひ併せてご確認ください。
準備
ページ選択用のインデックスを用意
StatefulWidget の状態として何ページ目を表示するのかを管理する、
インデックスを用意します。
int _currentIndex = 0;表示するページを用意、設定
表示するページを用意します。
(今回はサンプルなので、簡略的なWidgetを用意していますが、
実際には表示するページを設定ください。)
List pages = [
    Container(
      height: double.infinity,
      width: double.infinity,
      color: Colors.red[100],
      child: const Center(child: Text('First Page')),
    ),
    Container(
      height: double.infinity,
      width: double.infinity,
      color: Colors.blue[100],
      child: const Center(child: Text('Second Page')),
    ),
    Container(
      height: double.infinity,
      width: double.infinity,
      color: Colors.green[100],
      child: const Center(child: Text('Third Page')),
    ),
    Container(
      height: double.infinity,
      width: double.infinity,
      color: Colors.orange[100],
      child: const Center(child: Text('Forth Page')),
    ),
];このpagesをScaffoldのbodyに設定します。
(サンプルコードでは、SafeAreaを間に挟んでいます。)
body: SafeArea(child: pages[_currentIndex]),以上が表示するページの設定となります。
Navigation Barの設定
Navigation Bar をBottomNavigationBar プロパティに設定
Navigation Bar をBottomNavigationBar プロパティに設定します。
bottomNavigationBar: NavigationBar(
        // ・・・
      ),
destinationsプロパティに、NavigationDestinationを設定する
NavigationBarのdestinationsプロパティにNavigationDestinationを設定します。
NavigationDestinationは、NavigationBarに表示するアイコンやラベルを設定するものです。
selectedIconプロパティで選択された時のアイコンの表示を設定することができます。
destinations: const [
          NavigationDestination(
            selectedIcon: Icon(Icons.mail),
            icon: Icon(Icons.mail_outline),
            label: 'First',
          ),
          NavigationDestination(
            selectedIcon: Icon(Icons.egg),
            icon: Icon(Icons.egg_outlined),
            label: 'Second',
          ),
          NavigationDestination(
            selectedIcon: Icon(Icons.sms),
            icon: Icon(Icons.sms_outlined),
            label: 'Third',
          ),
          NavigationDestination(
            selectedIcon: Icon(Icons.settings),
            icon: Icon(Icons.settings_outlined),
            label: 'Forth',
          ),
インデックス操作を設定する
NavigationBarのselectedIndex プロパティに現在のページインデックスを管理する_currentIndexを設定します。
selectedIndex: _currentIndex,この設定で、_currentIndexが変化するのに応じてNavigationBarの表示も変化します。
Navigation Barのタブ選択時のインデックスの変更は、
onDestinationSelected プロパティにて行います。
設定例は以下のようになります。
onDestinationSelected: (index) => setState(() {
          _currentIndex = index;
        }),
以上で基本的な設定は完了となります。
サンプルコード全体
上のDartPadで紹介していますが、もう一度今回のサンプルコードの全体を記載します。
import 'package:flutter/material.dart';

void main() {
  runApp(const MyApp());
}

class MyApp extends StatelessWidget {
  const MyApp({Key? key}) : super(key: key);

  @override
  Widget build(BuildContext context) {
    return const MaterialApp(
      home: MyWidget(),
    );
  }
}

class MyWidget extends StatefulWidget {
  const MyWidget({Key? key}) : super(key: key);

  @override
  State createState() => _MyWidgetState();
}

class _MyWidgetState extends State {
  int _currentIndex = 0;

  List pages = [
    Container(
      height: double.infinity,
      width: double.infinity,
      color: Colors.red[100],
      child: const Center(child: Text('First Page')),
    ),
    Container(
      height: double.infinity,
      width: double.infinity,
      color: Colors.blue[100],
      child: const Center(child: Text('Second Page')),
    ),
    Container(
      height: double.infinity,
      width: double.infinity,
      color: Colors.green[100],
      child: const Center(child: Text('Third Page')),
    ),
    Container(
      height: double.infinity,
      width: double.infinity,
      color: Colors.orange[100],
      child: const Center(child: Text('Forth Page')),
    ),
  ];

  @override
  Widget build(BuildContext context) {
    return Scaffold(
      body: SafeArea(child: pages[_currentIndex]),
      bottomNavigationBar: NavigationBar(
        selectedIndex: _currentIndex,
        onDestinationSelected: (index) => setState(() {
          _currentIndex = index;
        }),
        destinations: const [
          NavigationDestination(
            selectedIcon: Icon(Icons.mail),
            icon: Icon(Icons.mail_outline),
            label: 'First',
          ),
          NavigationDestination(
            selectedIcon: Icon(Icons.egg),
            icon: Icon(Icons.egg_outlined),
            label: 'Second',
          ),
          NavigationDestination(
            selectedIcon: Icon(Icons.sms),
            icon: Icon(Icons.sms_outlined),
            label: 'Third',
          ),
          NavigationDestination(
            selectedIcon: Icon(Icons.settings),
            icon: Icon(Icons.settings_outlined),
            label: 'Forth',
          ),
        ],
      ),
    );
  }
}
まとめ

本記事では、Material You で推奨となっているBottom Navigation Barの実装方法について 解説しました。
いかがだったでしょうか?
Bottom Navigation Barはさまざまなアプリで使うUI部品かと思います。 これから実装する際に、ぜひ今回の内容を参考にしてみてください!
Flutterを一緒に学んでみませんか? Flutter エンジニアに特化した学習コミュニティ、Flutter大学への入会は、 以下の画像リンクから。
参考
編集後記(2022/5/6)
今回はMaterial You のNavigation Barについての記事でした。
以前のNavigation Barよりも、よりわかりやすくなっていますよね。
Material You での変更点についてはNavigation Barの他にもさまざまなものがあります。
こちらのページにて紹介されているので、 是非一度読んでみることをオススメします。
週刊Flutter大学では、Flutterに関する技術記事、Flutter大学についての紹介記事を投稿していきます。 記事の更新情報はFlutter大学Twitterにて告知します。
