

本記事ではそんな悩み、要望にお答えします。
かわいい画面遷移アニメーションの実装方法として、 liquid_swipeパッケージを使った方法を紹介します。
このパッケージを使うと、以下のような画面遷移アニメーションが実装可能です。
ちょっとアプリに個性を出したい、 そんなあなたにぴったりのパッケージとなっています。
ぜひ本記事を読んで実装してみてください!
基本的な使い方

まずはliquid_swipeパッケージの基本的な使い方を紹介します。
パッケージのインストール
まず、パッケージをインストールします。
pubspec.yamlのdependenciesに以下のように追記します。
dependencies:
  flutter:
    sdk: flutter
liquid_swipe: ^2.1.1 #追加追記したらflutter pub getをし、パッケージをインストールしましょう。
パッケージのバージョンは以下のページを確認してください。
インポート
実装したいdartファイルに以下の文を追加し、パッケージをインポートしましょう。
import 'package:liquid_swipe/liquid_swipe.dart';これで利用する準備は完了です。
実装
まず、画面遷移させるページのリストを用意します。
static List pages = [
    Container(
      color: Colors.red,
    ),
    Container(
      color: Colors.yellow,
    ),
    Container(
      color: Colors.green,
    ),
];次に実装したい部分にLiquidSwipe Widgetを配置し、
pagesプロパティに上で定義した画面のリストを指定します。
全体のコードは以下のようになります。
import 'package:flutter/material.dart';
import 'package:liquid_swipe/liquid_swipe.dart';

void main() {
  runApp(const MyApp());
}

class MyApp extends StatelessWidget {
  const MyApp({Key? key}) : super(key: key);

  @override
  Widget build(BuildContext context) {
    return const MaterialApp(
      home: LiquidSwipeSample(),
    );
  }
}

class LiquidSwipeSample extends StatelessWidget {
  const LiquidSwipeSample({Key? key}) : super(key: key);

  static List pages = [
    Container(
      color: Colors.red,
    ),
    Container(
      color: Colors.yellow,
    ),
    Container(
      color: Colors.green,
    ),
  ];

  @override
  Widget build(BuildContext context) {
    return Scaffold(
      appBar: AppBar(
        title: const Text('Liquid Swipe Sample'),
      ),
      body: LiquidSwipe(
        pages: pages,
      ),
    );
  }
}
実行結果は以下のようになります。
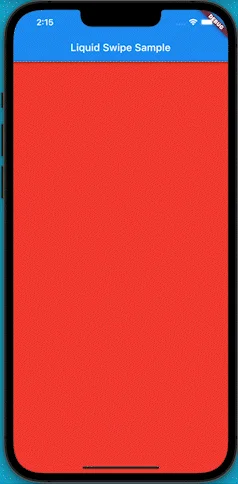
右から左へスワイプすることで、 液体が揺れたようなアニメーションで画面を遷移させることができます。
以上が基本的な使い方でした。
カスタマイズ

LiquidSwipe Widgetにはさまざまな設定要素が用意されており、
カスタマイズが可能となっています。
いくつか代表的なものを紹介します。
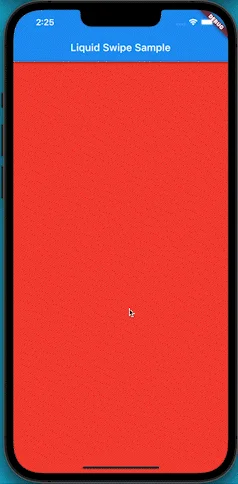
アニメーションの変更
waveType: WaveType.circularReveal を指定することで、
スワイプした部分から円を描いて広がるような画面遷移アニメーションに
変更することが可能です。
実装コード
@override
  Widget build(BuildContext context) {
    return Scaffold(
      appBar: AppBar(
        title: const Text('Liquid Swipe Sample'),
      ),
      body: LiquidSwipe(
        pages: pages,
        waveType: WaveType.circularReveal,
      ),
    );
  }
実行結果
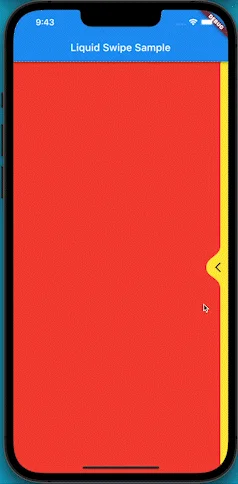
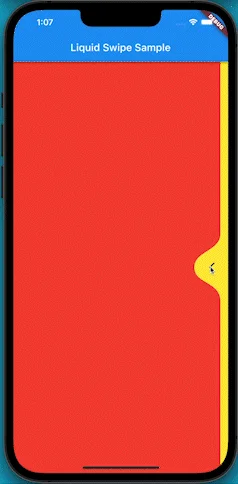
アイコンの追加
slideIconWidget: にアイコンなどのWidgetを指定することで、
画面右端にスワイプを示唆するようなアイコンを表示することができます。
アイコンの位置は、positionSlideIcon: に、
全体の高さに対する割合(0~1の値)を指定することで設定可能です。
また、enableSideReveal: true とすると、画面右端に次の画面が少し表示されます。
実装コード
@override
  Widget build(BuildContext context) {
    return Scaffold(
      appBar: AppBar(
        title: const Text('Liquid Swipe Sample'),
      ),
      body: LiquidSwipe(
        pages: pages,
        slideIconWidget: const Icon(Icons.arrow_back_ios),
        positionSlideIcon: 0.5,
        enableSideReveal: true,
      ),
    );
  }
実行結果
LiquidSwipe.builderを使った実装
LiquidSwipe.builder を使うと、各インデックス毎にページを生成することが可能です。
実装コード
@override
  Widget build(BuildContext context) {
    return Scaffold(
      appBar: AppBar(
        title: const Text('Liquid Swipe Sample'),
      ),
      body: LiquidSwipe.builder(
        itemCount: pages.length,
        itemBuilder: (BuildContext context, int index) {
          return pages[index];
        },
      ),
    );
  }
その他設定
その他の設定項目について2つ紹介します。
ページ遷移時に発火するメソッドの設定
onPageChangeCallback: にメソッドを設定することで、
ページ変更の際にメソッドを発火させることが可能となります。
スワイプ感度設定
fullTransitionValue: に数値を設定することで、
スワイプに対するアニメーションの反応速度をコントロールすることが可能です。
デフォルトは400で設定されており、0に近づくほど速度は速くなります。
LiquidSwipeController

liquid_swipeパッケージにはLiquidSwipeControllerが用意されており、
特定ページへの移動や、現在のページインデックスの取得などが可能です。
利用例と実装例を見ていきます。
LiquidSwipeControllerの利用例
特定のページへの移動
LiquidSwipeControllerに用意されている、
animateToPage({required int page, int duration = 600})のメソッドで、
特定ページへとアニメーション付きで画面遷移させることが可能です。
また、jumpToPage({required int page})メソッドを使うことで、
アニメーションなしで特定ページへの移動が可能となります。
現在のページインデックスの取得
LiquidSwipeControllerのcurrentPageプロパティを使うことで、
現在のページのインデックスの取得が可能です。
LiquidSwipeControllerを使った実装
実装方法の解説
今回はStatefulWidgetにて解説します。
LiquidSwipeControllerを利用するためには、変数の宣言とinitStateでのインスタンスの取得が必要です。
コードとしては以下のようになります。
class _LiquidSwipeSampleState extends State {
  late LiquidController _liquidController;

  @override
  void initState() {
    _liquidController = LiquidController();
    super.initState();
  }
// 省略
}
後は、好きな場所で、
_liquidController.animateToPage(page: 2)として、特定画面への遷移を指示したり、
_liquidController.currentPageとして、現在のページを取得したりできます。
サンプルコード
LiquidSwipeControllerを使って特定ページへの移動と、
現在のページインデックスの取得を可能にしたサンプルコードを紹介します。
import 'package:flutter/material.dart';
import 'package:liquid_swipe/liquid_swipe.dart';

void main() {
  runApp(const MyApp());
}

class MyApp extends StatelessWidget {
  const MyApp({Key? key}) : super(key: key);

  @override
  Widget build(BuildContext context) {
    return const MaterialApp(
      home: LiquidSwipeSample(),
    );
  }
}

class LiquidSwipeSample extends StatefulWidget {
  const LiquidSwipeSample({Key? key}) : super(key: key);

  @override
  State createState() => _LiquidSwipeSampleState();
}

class _LiquidSwipeSampleState extends State {
  late LiquidController _liquidController;

  final pages = [
    Container(
      color: Colors.red,
    ),
    Container(
      color: Colors.yellow,
    ),
    Container(
      color: Colors.green,
    ),
  ];

  @override
  void initState() {
    _liquidController = LiquidController();
    super.initState();
  }

  @override
  Widget build(BuildContext context) {
    return Scaffold(
      appBar: AppBar(
        title: const Text('Liquid Swipe Sample'),
      ),
      body: LiquidSwipe(
        pages: pages,
        liquidController: _liquidController,
        slideIconWidget: IconButton(
          icon: const Icon(Icons.arrow_back_ios),
          onPressed: () {
            if (_liquidController.currentPage == pages.length - 1) {
              _liquidController.animateToPage(page: 0);
            } else {
              _liquidController.animateToPage(
                  page: _liquidController.currentPage + 1);
            }
          },
        ),
        positionSlideIcon: 0.5,
        enableSideReveal: true,
      ),
    );
  }
}
実行結果は以下のようになります。
アイコンタップで次の画面へと遷移していきます。
以上がLiquidSwipeControllerの使用法でした。
まとめ

本記事では、かわいい画面遷移アニメーションの実装方法として、 liquid_swipeパッケージを使った方法を紹介しました。
いかがだったでしょうか?
今回のパッケージは、How To Useの画面遷移など、 連続して表示するような画面遷移につかうと良さそうです。
ぜひ本記事を参考に使ってみてください!
本記事があなたのアプリ開発の一助となれば幸いです。
Flutterを一緒に学んでみませんか? Flutter エンジニアに特化した学習コミュニティ、Flutter大学への入会は、 以下の画像リンクから。
編集後記(2022/4/8)
今日、街中を自転車で走っていると、桜が葉桜となっていることに気がつきました。 コートも必要ないくらいに暖かくなり、もうすっかり春ですね。
あなたはどれくらいリモートで仕事をしていますか?
普段リモートで、家で仕事をしていてほとんど外出しない、 そんな人が増えたかと思います。
自分は引きこもりがちな性格のため、これを良しと思っています。 ですが、街中の建物の工事の進み具合だったり、 季節の変化だったりを感じにくくなったのはちょっと寂しい気もします。
まだまだ世間的には厳しい状態が続いていますが、 早く何も気にせずに街中から季節の変化を感じられるような状況になって欲しいと、 心から願っています。
週刊Flutter大学では、Flutterに関する技術記事、Flutter大学についての紹介記事を投稿していきます。 記事の更新情報はFlutter大学Twitterにて告知します。
