

そんなあなたに、本記事ではFlutterのテンプレートアプリである Skeleton テンプレートについて、徹底解説します。
作成方法から、主要な機能に至るまで詳細に解説していきます。
読めばFlutter力がレベルアップすること間違いなしです!
それでは、お楽しみください!
Skeleton テンプレートとは

概要
Skeletonテンプレートとは、Flutter v2.5によって追加されたFlutterのテンプレートです。 リストビューとアイテムの詳細ページ、設定ページが用意されています。
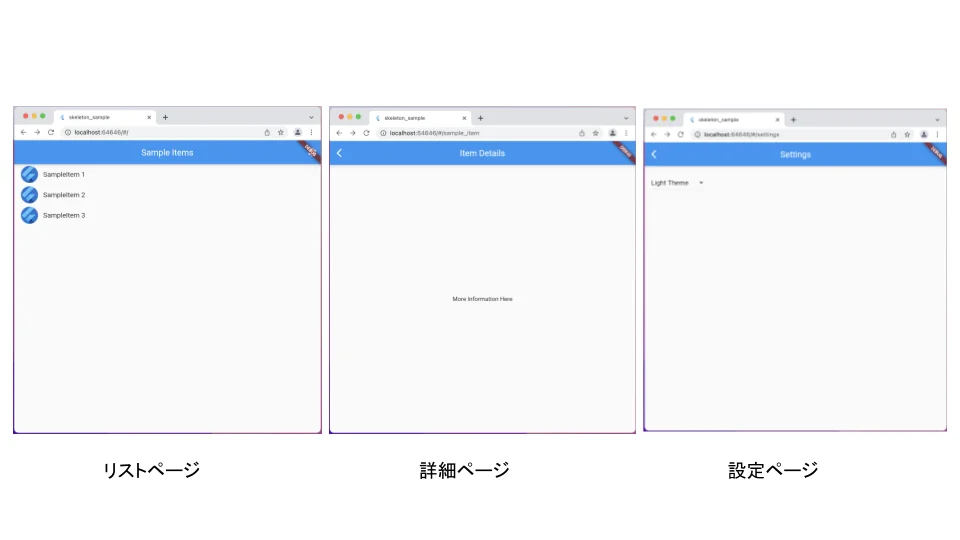
設定ページでテーマを選択することで、アプリ全体をダークモードにすることが可能です。

作成方法
Skeleton テンプレートの利用方法を解説します。
Skeleton テンプレートを利用するにはコマンドラインからの実行が必要です。
Flutterプロジェクトを作成したいディレクトリに移動し、 以下のコマンドを実行します。
flutter create -t skeleton ファイル名ファイル名を仮にskeleton_sampleとするなら、
flutter create -t skeleton skeleton_sampleとなります。
作成は以上で完了です。
Flutter関連部分は以下のようなフォルダ構成でテンプレートが作成されているはずです。
最初はコマンドラインからのアプリ作成は慣れないかもしれませんが、 慣れてしまえばとても簡単に作成できます。
Skeleton テンプレートの機能

Skeletonテンプレートで実装されたアプリが持つ機能を3つ紹介し、 その実装コードについて詳しく解説していきます。
Skeletonテンプレートで実装されたアプリが持つ機能は主に以下の3つです。
- 画面遷移
- 多言語化対応
- テーマ変更
それぞれ解説していきます。
画面遷移
一つ目の機能は画面遷移です。
『リストページからアイテムをタップすることで詳細ページに移動する』 『リストページから右上の歯車アイコンをタップすることで設定ページに移動する』
などの画面遷移が実装されています。
実装部分のコードについてみていきましょう。
app.dart 65 ~ 80行目
//1
          onGenerateRoute: (RouteSettings routeSettings) {
            return MaterialPageRoute(
              settings: routeSettings,
              //2
              builder: (BuildContext context) {
                switch (routeSettings.name) {
                  case SettingsView.routeName:
                    return SettingsView(controller: settingsController);
                  case SampleItemDetailsView.routeName:
                    return const SampleItemDetailsView();
                  case SampleItemListView.routeName:
                  default:
                    return const SampleItemListView();
                }
              },
            );
          },
//1
MaterialApp のonGeneratedRoute を設定することで、
Webでアプリを立ち上げた際、ブラウザのアドレスバーによる画面遷移が可能となります。
//2
画面遷移時に与えられるrouteSettingのname変数の値によって遷移先を分岐しています。
このアプリでは画面ごとにrouteNameを定数で持っており、
routeSettingのname変数がViewのrouteNameと同じならそのViewに移動する、
というロジックとなっています。
例えば、routeSettingのname変数が'/sample_item'なら、
routeNameとして'/sample_item'を持っているSampleDetailsViewに移動する、
という画面遷移です。
まとめると、以下になります。
- 各画面に
routeNameの定数を用意すること MaterialPageRouteのbuilder内でrouteSetting.nameでswitchの条件分岐を行い、routeNameと一致したらその画面をreturnすること
routeSettingが目に現れてこないのでわかりずらいですが、
アドレスバーによる画面遷移を実装するときの参考になるかと思います。
ぜひチャレンジしてみてください。
多言語化対応
Skeletonテンプレートのアプリでは多言語対応をすぐにできるよう、準備がされています。
テンプレートのデフォルトでは英語対応しかしていないため、 ここでは日本語を追加してみましょう。
まず、app.dart 44~46行目、supportedLocalesにLocale('ja','')を追加しましょう。
supportedLocales: const [
            Locale('en', ''), // English, no country code
            Locale('ja',''),
          ],
lib/src/loalizationフォルダにapp_ja.arbファイルを追加し、 以下を書き込みましょう。
{
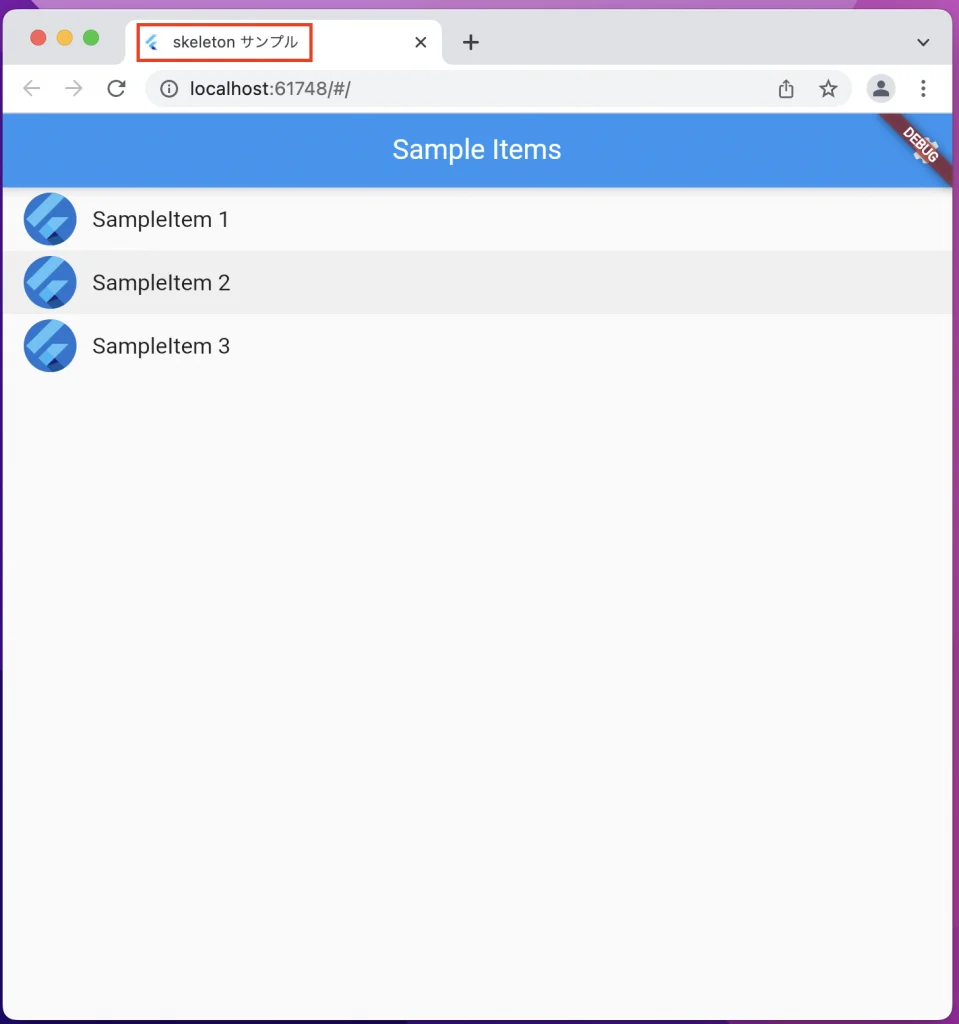
"appTitle": "skeleton サンプル"
}コマンドラインで以下のコマンドを実行しましょう。
flutter gen-l10n設定は以上となります。簡単ですね。
今回設定した内容がどこに反映されるかというと、アプリのタイトルです。
app.dart 53~54行目
onGenerateTitle: (BuildContext context) =>
              AppLocalizations.of(context)!.appTitle,
アプリをchromeで開いてみてください。 chromeのタブ部分のアプリタイトルが「skeletonサンプル」と日本語に変わっていれば成功です。
chromeの設定→詳細設定→言語で言語を英語に変えると、「skeleton_sample」と英語になるのが確認できます。
このようにSkeletonテンプレートを使うと簡単に日本語、英語対応ができます。
ゼロからの実装方法については下記記事にて解説しています。

テーマ変更
Skeleton テンプレートで一番驚くのが、概要でも説明したテーマ変更だと思います。 ここではテーマ変更のコードについてポイントを解説していきます。
このテーマ変更で重要になってくるのは、SettingsControllerです。
このSettingsControllerがテーマを保持していて、
このテーマに応じてアプリを変更しています。
このアプリでSettingsControllerを一つだけ使うため、
main関数内で生成し、MyApp,SettingsViewに受け渡しています。
main.dart 7~ 20行目
void main() async {
  // Set up the SettingsController, which will glue user settings to multiple
  // Flutter Widgets.
  final settingsController = SettingsController(SettingsService());

  // Load the user's preferred theme while the splash screen is displayed.
  // This prevents a sudden theme change when the app is first displayed.
  await settingsController.loadSettings();

  // Run the app and pass in the SettingsController. The app listens to the
  // SettingsController for changes, then passes it further down to the
  // SettingsView.
  runApp(MyApp(settingsController: settingsController));
}
app.dart 61行目
themeMode: settingsController.themeMode,app.dart 70~71行目
case SettingsView.routeName:
                    return SettingsView(controller: settingsController);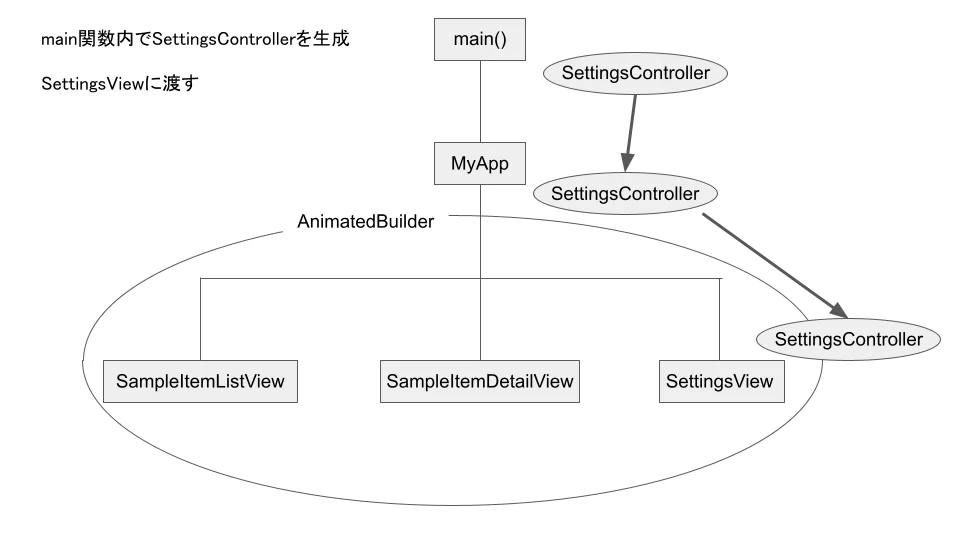
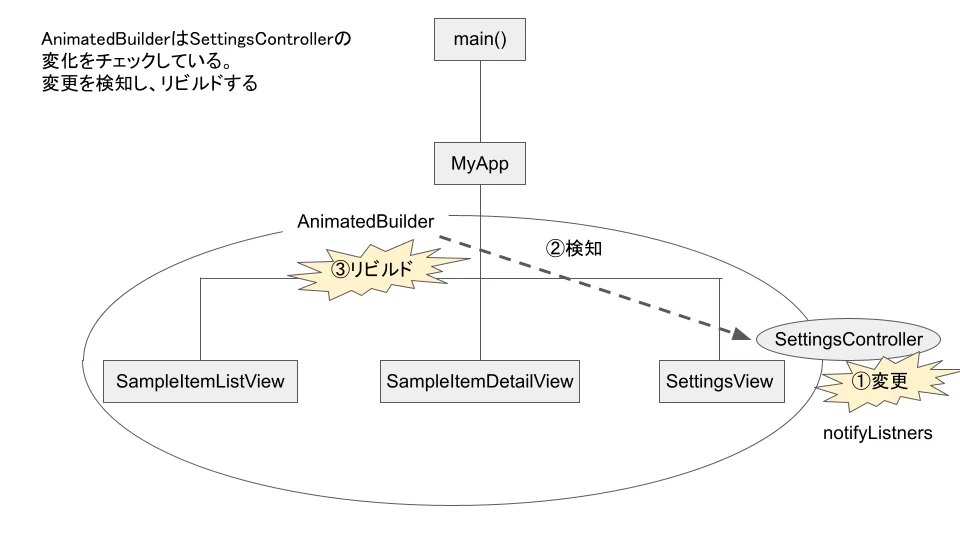
AnimatedBuilderはSettingControllerの変化をチェックしています。
変更を検知すると、子をリビルドします。
app.dart 25~28行目
return AnimatedBuilder(
      animation: settingsController,
      builder: (BuildContext context, Widget? child) {
return MaterialApp(SettingViewにてテーマの変更をすると、
settingController.updateThemeModeメソッドが走ります。
SettingControllerはChangeNotifierを継承しているため、
このメソッドの中でnotifyListnersを行うことで、
このインスタンスに変化があったことを、周知することができます。
settings_controller.dart 34~44行目
Future updateThemeMode(ThemeMode? newThemeMode) async {
    if (newThemeMode == null) return;

    // Do not perform any work if new and old ThemeMode are identical
    if (newThemeMode == _themeMode) return;

    // Otherwise, store the new ThemeMode in memory
    _themeMode = newThemeMode;

    // Important! Inform listeners a change has occurred.
notifyListeners();これによりAnimatedBuilderが変更を検知し、リビルドしてテーマの変更を反映する
というのが、テーマ変更の流れです。
まとめると、以下の図のようになります。
ChangeNotifier やnotifyListnersはよく使うので、
テンプレートで使い方が確認できるのはとても良いですね。
まとめ

本記事ではFlutterのテンプレートアプリである Skeleton テンプレートについて、解説しました。
基本的な作成方法から、Skeleton テンプレートが持っている機能まで、 詳細に解説していきました。
ちょっと難しく、とっかかりにくい部分もあるかもしれませんが、 理解すればSkeletonの名のとおりアプリの骨組についての知識は 身につくのではないかと思います。
本記事があなたのアプリ開発の一助となれば幸いです。
Flutterを一緒に学んでみませんか? Flutter エンジニアに特化した学習コミュニティ、Flutter大学への入会は、 以下の画像リンクから。
編集後記(2022/03/16)
今回はSkeletonテンプレートについての解説記事でした。
カウンターアプリのテンプレートもよくできてはいますが、 実力がついてくると少し物足りなくなってきます。
そんな人に今回紹介したSkeletonテンプレートはおすすめです。
コードリーディングするだけでかなり実力がつくかと思います。 今回紹介した以外でも細かい部分で、なるほど、となるところがあるはずです。
ぜひ一度、コードリーディングしてみることをお勧めします。
週刊Flutter大学では、Flutterに関する技術記事、Flutter大学についての紹介記事を投稿していきます。 記事の更新情報はFlutter大学Twitterにて告知します。
