「Flutterでストップウォッチを実装したい!」
本記事ではそんな要望にお答えします。
stop_watch_timer パッケージを使ったストップウォッチ機能の実装方法について解説します。
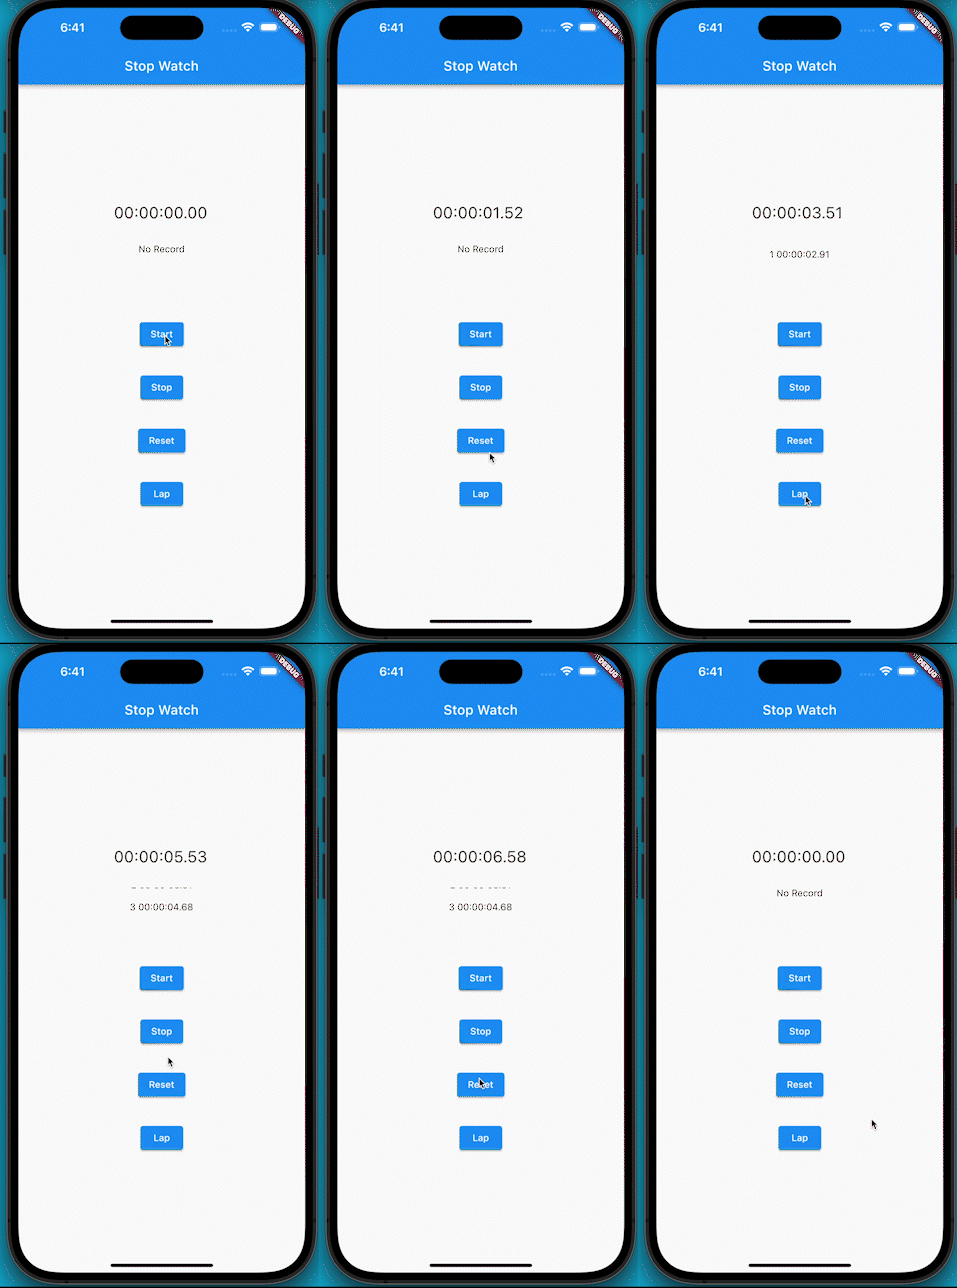
このパッケージを利用すると以下のようなストップウォッチが実装可能です。

パッケージの基本的な使い方から、用意されているメソッド等の詳細まで解説します。
ぜひ読んでみてください!
ストップウォッチの実装方法
ストップウォッチを実装する方法について解説していきます。
準備
まず準備として、パッケージのインストールと、
Dartファイルへのインポート文の追加を行います。
パッケージのインストール
CLI(macならターミナル)で、自分のプロジェクトのルートにて
以下のコマンドを実行しパッケージをインストールします。
flutter pub add stop_watch_timerパッケージのインポート
実装したいDartファイルの上部に以下のインポート文を追加し、
パッケージをインポートします。
import 'package:stop_watch_timer/stop_watch_timer.dart';実装
実装方法について解説します。
まず、StatefulWidgetの持つ状態として、StopWatchTimerインスタンスを用意します。disposeメソッドにて、状態のdisposeを設定します。
class CountUpPage extends StatefulWidget {
  const CountUpPage({super.key});

  @override
  State<CountUpPage> createState() => _CountUpPageState();
}

class _CountUpPageState extends State<CountUpPage> {
  final _stopWatchTimer = StopWatchTimer();

  @override
  void initState() {
    super.initState();
  }

  @override
  void dispose() {
    _stopWatchTimer.dispose();
    super.dispose();
  }

  @override
  Widget build(BuildContext context) {
    // ...
  }
}ストップウォッチの経過ミリ秒数は、StopWatchTimer.rawTime でStreamで取得できます。
StopWatchTimer.gatDisplayTime メソッドの引数にミリ秒数を与えることで、
00:00:00:00の形で経過時間を取得できます。
上記を踏まえ、StreamBuilderにて時間表示を実装したものが以下となります。
            StreamBuilder<int>(
              stream: _stopWatchTimer.rawTime,
              initialData: _stopWatchTimer.rawTime.value,
              builder: (context, snapshot) {
                final displayTime = StopWatchTimer.getDisplayTime(
                  snapshot.data!,
                );
                return Center(
                  child: SizedBox(
                    width: 144,
                    child: Text(
                      displayTime,
                      style: const TextStyle(fontSize: 24),
                    ),
                  ),
                );
              },
            ),
ストップウォッチのスタート、ストップ、リセットはそれぞれ以下のメソッドにて実行可能です。
final _stopWatchTimer = StopWatchTimer();

//スタート
_stopWatchTimer.onStartTimer();

//ストップ
_stopWatchTimer.onStopTimer();

//リセット
_stopWatchTimer.onResetTimer();
ラップの実装
ストップウォッチのラップタイム(StopWatchRecord)のリストは、StopWatchTimer.recordsで、Streamで取得できます。
StopWatchRecord.displayTimeで00:00:00:00の形でラップタイムを取得できます。
StreamBuilderでの実装例は以下となります。
              StreamBuilder<List<StopWatchRecord>>(
                stream: _stopWatchTimer.records,
                initialData: const [],
                builder: (
                  BuildContext context,
                  AsyncSnapshot<List<StopWatchRecord>> snapshot,
                ) {
                  final value = snapshot.data;
                  if (value!.isEmpty) {
                    return const Text('No Record');
                  }
                  return ListView.builder(
                    controller: _scrollController,
                    itemCount: value.length,
                    itemBuilder: (BuildContext context, int index) {
                      final data = value[index];
                      return Column(
                        children: [
                          Padding(
                            padding: const EdgeInsets.all(8),
                            child: Text('${index + 1} ${data.displayTime}'),
                          ),
                        ],
                      );
                    },
                  );
                },
              ),
ラップタイムの記録は以下のメソッドにて可能です。
final _stopWatchTimer = StopWatchTimer();

//ラップタイムの記録
_stopWatchTimer.onAddLap();
上記を実装したサンプルコードは以下となります。
是非参考にしてみてください。
import 'package:flutter/material.dart';
import 'package:stop_watch_timer/stop_watch_timer.dart';

void main() {
  runApp(const MyApp());
}

class MyApp extends StatelessWidget {
  const MyApp({super.key});

  @override
  Widget build(BuildContext context) {
    return MaterialApp(
      theme: ThemeData(
        primarySwatch: Colors.blue,
      ),
      home: const CountUpPage(),
    );
  }
}

class CountUpPage extends StatefulWidget {
  const CountUpPage({super.key});

  @override
  State<CountUpPage> createState() => _CountUpPageState();
}

class _CountUpPageState extends State<CountUpPage> {
  final _stopWatchTimer = StopWatchTimer();

  final _scrollController = ScrollController();

  @override
  void initState() {
    super.initState();
  }

  @override
  void dispose() {
    _stopWatchTimer.dispose();
    _scrollController.dispose();
    super.dispose();
  }

  @override
  Widget build(BuildContext context) {
    return Scaffold(
      appBar: AppBar(
        title: const Text('Stop Watch'),
      ),
      body: Center(
        child: Column(
          mainAxisAlignment: MainAxisAlignment.center,
          children: [
            StreamBuilder<int>(
              stream: _stopWatchTimer.rawTime,
              initialData: _stopWatchTimer.rawTime.value,
              builder: (context, snapshot) {
                final displayTime = StopWatchTimer.getDisplayTime(
                  snapshot.data!,
                );
                return Center(
                  child: SizedBox(
                    width: 144,
                    child: Text(
                      displayTime,
                      style: const TextStyle(fontSize: 24),
                    ),
                  ),
                );
              },
            ),
            const SizedBox(height: 32),
            SizedBox(
              height: 80,
              child: StreamBuilder<List<StopWatchRecord>>(
                stream: _stopWatchTimer.records,
                initialData: const [],
                builder: (
                  BuildContext context,
                  AsyncSnapshot<List<StopWatchRecord>> snapshot,
                ) {
                  final value = snapshot.data;
                  if (value!.isEmpty) {
                    return const Text('No Record');
                  }
                  return ListView.builder(
                    controller: _scrollController,
                    itemCount: value.length,
                    itemBuilder: (BuildContext context, int index) {
                      final data = value[index];
                      return Column(
                        children: [
                          Padding(
                            padding: const EdgeInsets.all(8),
                            child: Text('${index + 1} ${data.displayTime}'),
                          ),
                        ],
                      );
                    },
                  );
                },
              ),
            ),
            const SizedBox(height: 32),
            ElevatedButton(
              onPressed: _stopWatchTimer.onStartTimer,
              child: const Text('Start'),
            ),
            const SizedBox(height: 32),
            ElevatedButton(
              onPressed: _stopWatchTimer.onStopTimer,
              child: const Text('Stop'),
            ),
            const SizedBox(height: 32),
            ElevatedButton(
              onPressed: _stopWatchTimer.onResetTimer,
              child: const Text('Reset'),
            ),
            const SizedBox(height: 32),
            ElevatedButton(
              onPressed: () async {
                if (!_stopWatchTimer.isRunning) {
                  return;
                }
                _stopWatchTimer.onAddLap();
                await Future<void>.delayed(const Duration(milliseconds: 100));
                await _scrollController.animateTo(
                  _scrollController.position.maxScrollExtent,
                  duration: const Duration(milliseconds: 200),
                  curve: Curves.easeOut,
                );
              },
              child: const Text('Lap'),
            ),
          ],
        ),
      ),
    );
  }
}
用意されているメソッドなど
カウントダウン
StopWatchTimerのインスタンス生成時にmodeとpresetMillisecondを設定することで、
カウントダウンするタイマーを実装可能です。
  final _stopWatchTimer = StopWatchTimer(
    mode: StopWatchMode.countDown,
    presetMillisecond: 1000 * 60,
  );
リスナー
StopWatchTimer.rawTime.listen 等で、
ミリ秒の変化時やストップ時などに実行される関数を設定可能です。
_stopWatchTimer.rawTime.listen((value) => print('rawTime $value'));

_stopWatchTimer.minuteTime.listen((value) => print('minuteTime $value'));

_stopWatchTimer.secondTime.listen((value) => print('secondTime $value'));

_stopWatchTimer.records.listen((value) => print('records $value'));

_stopWatchTimer.fetchStopped.listen((value) => print('stopped from stream'));

_stopWatchTimer.fetchEnded.listen((value) => print('ended from stream'));
まとめ
本記事では、stop_watch_timer パッケージを使ったストップウォッチ機能の実装方法について解説しました。
基本的な使い方から用意されているメソッドまで詳細に解説しました。
いかがだったでしょうか?
タイマーで実行される機能等を実装するのに、非常に役に立つパッケージかと思います。
ぜひ、参考にしてみてください。
本記事があなたのアプリ開発の一助となれば幸いです。
編集後記(2022/11/6)
ストップウォッチの実装方法についての解説記事でした。
このパッケージを使えば、例えばデザイン面でネイティブアプリと差別化したストップウォッチを実装できたりするので、
アプリ開発に非常に役に立つかと思います。
0秒ちょうどで止めるゲームを実装したりとか、
ゲームのカウントダウンに役に立てたりとかするのも面白そうです。
色々な活用方法が思い浮かぶパッケージでしたね。
使い勝手も非常によいので、ぜひ一度使ってみていただければ、と思いました。
週刊Flutter大学では、Flutterに関する技術記事、Flutter大学についての紹介記事を投稿していきます。
記事の更新情報はFlutter大学Twitterにて告知します。
ぜひぜひフォローをお願いいたします。


